Google blocklists around 10,000 websites every day. Are you one of them? For most website owners, the security warnings, hack indicators, and diagnostic pages can be daunting. This guide is to help website owners understand what a blocklist is, how to remove website hacks, and resolve Google security warnings. This will help you quickly restore your website and reclaim visitors, revenue, and SEO rankings.
Google is the most used search engine in the world and is committed to providing its users a safe online experience. To achieve this, it has invested resources in identifying and flagging any potentially malicious websites by “blocklisting” them. This is meant to tell the user to move forward with caution, notify the website owner of an issue, and simultaneously impede the attacker’s intentions.
When a search engine blocklists a website, it refers to the process of them removing a website from their index. When a website is blocklisted, it usually loses nearly 95% of its organic traffic, which quickly impacts sales and revenue.
Do you want to know your website’s malware or blocklisting status? Our Sucuri SiteCheck scanner will check for blocklisting status and visible malware incursions. Click here to run a report, or if you run a WordPress site, install our free WordPress security plugin to automate your security scans.
Sites are blocklisted when authorities — such as Google, Bing, Norton Safe Web, McAfee SiteAdvisor, etc. — find irregularities on a website that they believe to be malware. Malware can come in many forms: trojan horses, phishing schemes, pharma hacks, email, or information scraping. Most often, the website owner is not even aware that they have been hacked. However, it’s in the search engine’s best interest not to show infected results, as they don’t want it to damage their integrity. There are several different categories for blocklisting, depending on why the website was blocklisted. For example, some websites are blocklisted for having spam, others for having phishing links, or more generically for having malware. We will dig deeper on types of blocklisting reasons below.
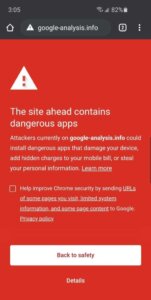
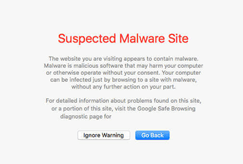
Most of today’s browsers will present the user with their own unique variation of a site being blocklisted for malware. For example, you can check out Chrome’s blocklists here: chrome://interstitials/. The images below represent some of the more popular browsers and the warnings you can come to expect when a site is blocklisted. The red splash page, also known as an interstitial page, is designed to protect and deter the user from proceeding.
The following are some of the warning messages reserved for malware blocklists:
Not all messages above are from Google and not all browsers use the Google SafeBrowsing API to validate if a site is safe. Each warning is designed to inform you to exercise caution if you continue on to visit the website which has likely been hacked and blocklisted because it has been distributing malware.
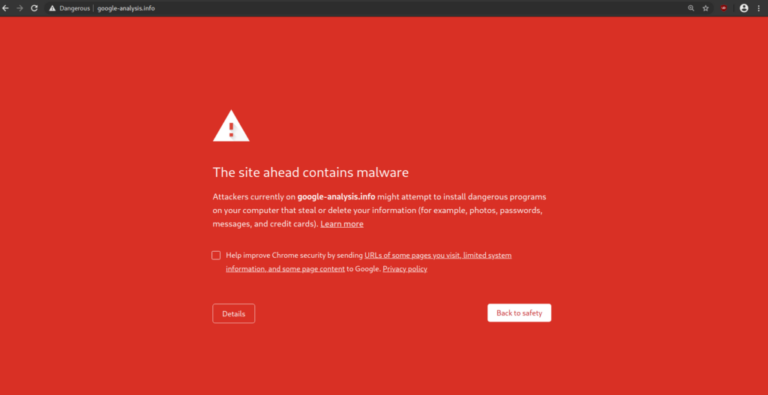
Chrome Desktop Notification – “The site ahead contains malware”
Chrome Mobile – “The site ahead contains dangerous apps”
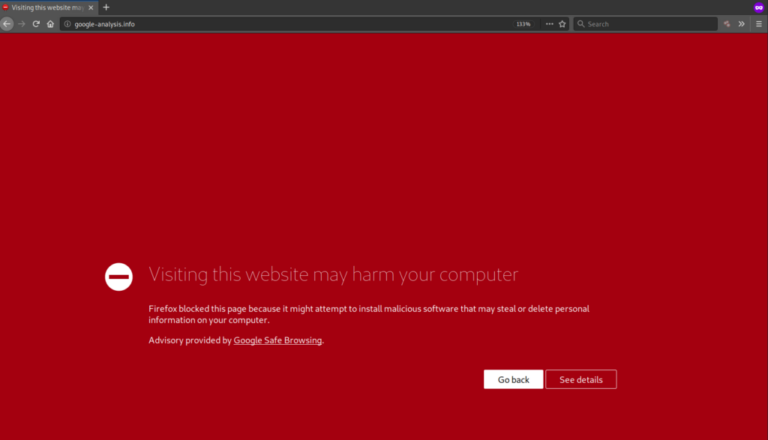
Firefox – “Visiting this website may harm your computer”
Safari – “Suspected malware site”
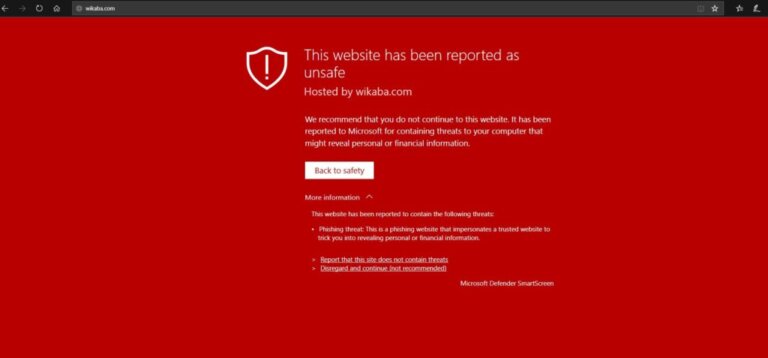
IE/Edge – “This website has been reported as unsafe”
This message is used to tell the user that Google believes a bad actor has made changes to the site by adding new pages in the form of spam. Visiting the site might redirect a visitor to a page showing various forms of spam links or spam pages.
This warning does not generate a red screen and shows exclusively in the Google Search Engine Results Pages (SERP). For more information on what to do if you see this warning visit the Google help pages.
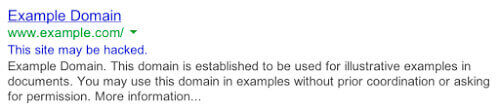
Google’s official explanation is: “You’ll see the message “This site may be hacked” when we believe a hacker might have changed some of the existing pages on the site or added new spam pages. If you visit the site, you could be redirected to spam or malware.”
This message is used to tell the user that Google believes bad actors have made changes to the site that distributes and installs malicious software on the visitor’s machine. Visiting the site may cause irreparable damage to your device that can include a number of drive-by download attacks or trick the visitor into downloading malware, such as ransomware.
Google is pretty accurate when it suspects a website is distributing malware to its users. The classification generates a big red image when visiting the site across multiple browsers that use the Google SafeBrowsing API. For more information on what to do if you see this notification visit the Google help pages.
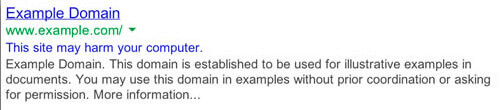
Google’s official explanation is: “You’ll see the message “This site may harm your computer” when we think the site you’re about to visit might allow programs to install malicious software on your computer.”
Each browser uses their own messaging when flagging a site as being blocklisted. If you see the below messages on your site in search, it has been blocklisted:
Your website is blocklisted because Google scanned your site and found harmful behavior. Google needs to protect its users from dangerous websites that show up in their search results. In fact, websites that repeatedly get blocklisted for malicious behavior are limited to only one review every 30 days. That red splash (interstitial) page (and warnings next to your site in Google’s search results) are designed to stop visitors from entering your site — and it works, too. Websites lose about 95% of their traffic when blocklisted by Google.
We have to mention the Google Safe Browsing page when talking about Google blocklist and security warnings. It’s a key page that all website owners should be aware of and utilize. It is also a quick way to determine if your website is blocklisted with Google for malware or phishing content.
Google Webmaster Tools will contain more specific information about your website security warnings.
You should determine what exactly is blocklisted by Google. On the Google Webmaster Tools page for your website, click on Security Issues and you will find the URLs that are being detected. If the URL is a directory, every page below it must be checked for malware.
Here are a few examples or URL blocklists:
This information can help you narrow down your search to specific sections of your site.
Next, look for when Google found the suspicious content was last found (the discovery date). You can find these dates next to the URLs provided in the Detected Issues section.
If you want Google to pick up your latest changes, you should request a malware review in Google Webmaster Tools. This will have Google rescan your site within a few days. To do this, click on the Security Issues section and then click the button “Request Review” to submit your site.
Unfortunately, references to malicious sites are usually complicated and Google does not always provide specific details about the blocklist. It is worth noting that hackers change the domain names of their malicious sites fairly often so they can’t be blocked. A compromised, legitimate website is often updated regularly to ensure it now links to these new malicious sites.
If all else fails, you can get professionals to clean your site.
When your site shows up in Google, warnings in search engine result pages (SERP) show if spam or redirects are detected on your site. These can also be triggered if your hacked site is used to infect visitors with malicious software through drive-by downloads. If your site is not showing the red warning page yet, but these warnings appear in your search results, it can indicate malicious scripts and iframes are being loaded from third-party sites. This can also sometimes be caused by third-party advertisements that load on your website and may be trying to spread malware through malvertising.
Most browser blocklists use the Google blocklist API. For more information visit the Google help pages.
You can use our free tool Sucuri SiteCheck to scan your site and find malicious payloads, malware locations, security issues, and blocklist status with major authorities.
To scan your website for hacks and blocklist warnings using Sucuri SiteCheck:
Note
If you have multiple websites on the same server, we recommend scanning them all for malicious content. Cross-site contamination is one of the leading causes of reinfections. We encourage every website owner to isolate their websites on separate hosting accounts.
If SiteCheck is able to find a payload, this can help narrow your search. The following section of this guide will help you manually review your site to look for suspicious elements in order to remove your blocklist.
To perform a complete malware removal, you should be able to edit files on your server. If you are not comfortable with this, get professionals to clean your site.
If you use a CMS such as WordPress or Joomla, you can rebuild the site using fresh copies of the core files and plugins directly from the official repositories. Custom files can be replaced with a recent backup, as long as it’s not infected.
If SiteCheck or Google Webmaster Tools indicate any malicious domains or payloads, you can start looking for those files on your server. The discovery date can also narrow your search to files modified around that time frame.
To manually remove a malware infection from your website files (NOT database):
You can also manually search for common malicious PHP functions, such as eval, base64_decode, gzinflate, preg_replace, str_replace, etc. Note that these functions are also used by plugins for legitimate reasons, so be sure you test changes or get help so you avoid breaking your site.
Hackers change malicious sites fairly often to avoid detection. As a result, Google’s Security Issues page may mention malicious or intermediary domains that can no longer be found on your site since they have already been replaced with new domains.
If you can’t find the “bad” content, try searching the web for the domain names listed on the diagnostic page. Chances are that someone else has already figured out how those domain names are involved in website malware.
Caution
Manually removing “malicious” code from your website files can be extremely hazardous. Never perform any actions without a backup. If you’re unsure, please seek assistance from a professional. Do not overwrite your CMS configuration files. On WordPress, this includes wp-config.php file or wp-content. On Joomla, this includes the configuration.php file and customizations.
To remove a malware infection from your website database, use your database admin panel to connect to the database. In cPanel, most hosting companies offer phpMyAdmin. You can also use tools like Search-Replace-DB or Adminer.
To manually remove a malware infection from your database tables:
Hackers always leave a way to get back into your site. More often than not, we find multiple backdoors like malicious admin users or PHP webshells, and overlooked vulnerabilities that end up getting your site blocklisted again.
Don’t overlook user accounts! Stolen passwords can allow hackers to get back into your site.
To clean up your user accounts:
Caution
These functions can also be used legitimately by plugins, so be sure to test any changes because you could break your site by removing benign functions. The majority of malicious code we see uses some form of encoding to prevent detection. Aside from premium components that use encoding to protect their authentication mechanism, it’s very rare to see encoding in official CMS files.
Oftentimes, backdoors are embedded in files named similar to CMS core files but located in the wrong directory. Attackers can also inject backdoors into legitimate files.
Backdoors commonly include the following PHP functions:
It is critical that all backdoors are removed to successfully clean a website hack otherwise, your site will get reinfected quickly and added to the blocklist.
It is possible for infections to jump from a computer to your website by using a CMS or file transfer applications. All computers used to access your website should be secured. Have all users scan their computers with an antivirus program to discover any infections.
Here are some antivirus programs we recommend:
Paid
Free
Note
Most browser blocklists use the Google blocklist API. For more information visit the Google help pages.
The Sucuri Firewall can help virtually patch known vulnerabilities and block attacks against your website.
To remove the blocklist warning, you need to let Google know that you have completely cleared the infection. To do this, you must have a Google Search Console account (formerly Webmaster Tools).
To verify ownership of your website in Google Search Console:
Google Safebrowsing is not the only website blocklist out there. However, many other authorities use Google’s API to add malicious websites to their own blocklists.
Antivirus programs and other search engines also want to warn their users when a website is dangerous. Each has their own console and review process. In order to remove your site from their blocklists, you need to go through the steps to let them know your website is clean.
If you used SiteCheck to scan your site for malware in the first step, the results will indicate whether your site has been blocklisted by some of the top authorities. The review process should be similar to Google Search Console. For example, the McAfee blocklist has a review submission form and both Bing and Yandex have their own webmaster tools that you should sign up for.
Other popular blocklist authorities:
If you do not request a review, Google may think you haven’t finished the site cleanup. By requesting a review, you are telling Google that you are ready for them to rescan your site. Google is now limiting repeat blocklist offenders to one review request every 30 days. Do not try to trick Google, either, as it may not pass the review process. For example, if the site is empty, it won’t pass a review. Be sure your site is clean before proceeding!
To request a security issue review from Google:
To request a spam review from Google:
The process will be similar for other blocklists such as McAfee, Bing, Yandex, and Norton.
Once you have submitted the blocklist removal request it can take a few days for Google to review your site, have Google reindex your site.
If the title and description of your web pages were infected with spam, it can take time for your search results to clear up. This is because Google only crawls your site every so often. Fortunately, in the Search Console, you can ask Google to refresh certain pages and the links on those pages.
To force Google to recrawl your site:
It will then ensure it can view your website without any errors and submit it for reindexing if it is successful. If it encounters any errors, you will need to review the errors and ensure your site is accessible to the Google bot.
If it is successful, you will get the following message: “URL was added to a priority crawl queue. Submitting a page multiple times will not change its queue position or priority.”
This will have Google crawl your homepage and any links on that page. If you have other pages showing in Google search results with spam in the title and description, you can also crawl those pages separately.
Note
Google Search Console allows you to crawl 500 single URLs per month and only 10 with direct links per month. These 10 are best used to crawl pages with many internal links, such as a public sitemap or your homepage.
If spam pages were removed from your site, they may have been indexed by Google already. The spam pages can create 404 (Not Found) errors when they are removed from your site. You can use the URL Removal Tool to tell Google these spam pages should be removed from their index.
To remove spam URLs causing 404 errors:
You should also consider taking more steps to harden and protect your site to prevent future blocklisting. This includes applying updates, maintaining a good website backup strategy, managing user privileges, and implementing website security controls.
The number of vulnerabilities exploited by attackers grows every day. Trying to keep up is challenging for administrators. Website Firewalls were invented to provide a perimeter defense system surrounding your website.
Benefits of using a website firewall:

Say on top emerging website security threats with our helpful guides, email, courses, and blog content.