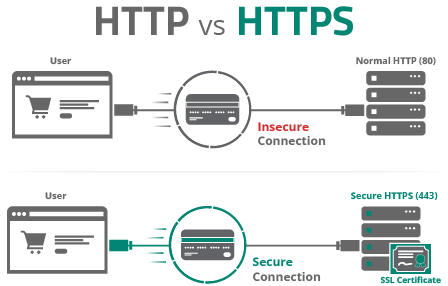
With an SSL certificate, your website can use the HTTPS protocol to securely transfer information from point A to B. This is crucial when transferring sensitive information like credit card data on checkout pages and personally identifiable information (PII) on login and contact forms.
In addition to security benefits, websites with SSL encryption get better rankings on Google and improved performance through the use of HTTP/2. It’s also important to understand that SSL does not protect your website — rather, it protects the data that is sent through your website.
This guide is designed to show beginners and intermediate users how to add a free SSL certificate from Let’s Encrypt on their self-hosted websites.
Contents
It is now easier than ever to use HTTPS on your website. Beginners should start by having a conversation with their hosting company about the options they offer.
There are a few easy ways to add SSL to your website:
Regardless of the type of certificate you choose, the encryption and level of security is the same.
Looking for support and enhanced website security? We’ve got you covered.
Some visitors recognize the additional authenticity and trust offered extended validation (EV) and organization validated (OV) certificates due to their rigorous validation process.
There are three types of certificates to be familiar with:
DV certificates only need the certificate authority to verify that the user requesting the certificate owns and administers the domain. Visitors will see a lock icon in their address bar, but no specific information about the owner.
OV certificates require a certificate authority to confirm the business making the request is registered and legitimate. When visitors click the green lock icon in their browser, the business name is listed.
EV certificates require even more documentation for the certificate authority to validate the organization. Visitors will see the name of the business inside the address bar (in addition to clicking the lock icon); however, most updated browsers no longer display the EV visual indicator.
It’s important to understand the difference between commercial and free certificates.
These are a decent option for many website owners. Paying a certificate authority (or your hosting company) will often give you the benefits of technical support. The encryption level is the same as with free SSL certificates. The key differentiator will come in the level of support you get with your certificate.
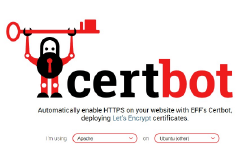
These are being spearheaded by the Let’s Encrypt initiative – an open collaboration between a number of global organizations focused on making SSL certificates accessible to all website owners.
Note
Many hosts offer specific instructions on how to deploy free SSL certificates. Check with your host’s support channels and articles for more information before following this guide.
You can also get the benefits of SSL certificates through cloud providers, such as content delivery networks (CDNs) and website application firewalls (WAFs) solutions like the one from Sucuri, who offer it at no additional charge.
These services are a proxy between the visitor and your website. By changing your domain records to point to their servers, they can cache your content to make your website faster and filter out malicious traffic. This also means that the browser recognizes which server IPs are connected to your domain, allowing for the use of DV certificates.
These providers can also work with your own SSL certificate. If you are a Sucuri customer, you can contact our technical support team for information and assistance.
Note
If you are implementing an SSL certificate through your host, you may want to skip ahead to Step 3: Important Final Steps.
The following guide works best if you have a dedicated IP for your site (through a VPS or dedicated server). If you’re on a shared platform, talk to your host about deploying Let’s Encrypt; a number of hosts have automated the process of deploying a free SSL for shared hosting accounts. It is possible to use server name indication (SNI) with one server IP address and generate certificates for all sites on the server.
The rest of this guide will assume you have full access and control of your web server.
You will need the following information about your server:
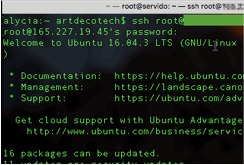
Now that you have all the required information, you can connect to your server and install a tool that will generate an SSL certificate.
From your computer, you need a way to log into your server and send SSH commands. If you are on a Mac, you can use Terminal (built-in application) and on Windows you can download PuTTY. Some hosts also offer a web interface for running commands on your server.
Note
The instructions will vary depending on your server software and system. Some systems do not support Certbot, but you can find a list of other reputable clients that should work with your server environment.
Here is a quick overview of how you can get a free SSL certificate from Let’s Encrypt using the Certbot tool.
The following images and animations illustrate the entire process for a server using Apache on Ubuntu 16.04.
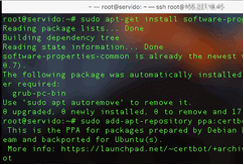
Using the instructions provided for your server, install any dependencies and the Certbot tool. The following images are an example of what you can expect.

Note
If you are getting permission errors, check with your host to ensure your user has permissions to run administrative commands (i.e. sudo).
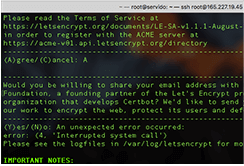
Continuing with the same set of instructions, the Get Started section will provide the commands needed to create the SSL certificate for your website. The following images are an example of what you can expect.
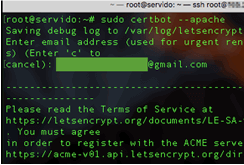
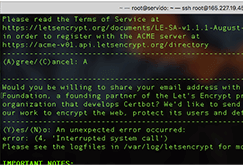
After generating the certificate the Important Notes shows the location of your Certbot configuration directory. This contains your account credentials, certificate, and private keys.
You should navigate to this location on your server and download a backup. If you aren’t sure how to do this, you can follow our post on how to make backups over the command line.
Now you have an active SSL certificate on your site! Your certificate will expire, however. Let’s Encrypt certificates are only valid for 90 days. You can automate this process so you don’t have to remember to manually renew the certificate.
It’s recommended to set the cron or systemd job to renew the certificate twice a day. Before you begin, note the location of your Certbot configuration directory from the previous step.
52 0,12 * * * root /var/log/letsencrypt/certbot-auto renew --quietNote
Some server configurations may need to run additional commands to load the new certs.
You can view the full documentation on Certbot renewals for more information.
These charitable organizations are working to help make the internet a safer place for everyone. While these tools are free, you can donate to help support both Let’s Encrypt and Certbot.
We’ve outlined instructions below for how to manually install a certificate (free or paid) using a hosting control panel such as Plesk or cPanel
Your certificate signing request displays in the CSR section.
While HTTPS is now an option on your site, the HTTP version of your site can still be accessed. Ideally, you should force all visitors (including search engines) to see the HTTPS version of your site. You should also take steps to fix mixed content warnings and update any proxy-based cloud services (such as firewalls and CDNs) to work with your new SSL certificate.
To force visitors to access your site only over HTTPS, you can edit your .htaccess or web.config file depending on your operating system and configuration. You can find this in the root of your site, and you may need to show hidden files to find it. Make sure to backup your control files before making any changes.
There are other methods for Apache, such as using your virtual host file. If you use an IIS server you can follow instructions to use the URL Rewrite Module and nginx servers can use the nginx configuration file.
Copy this directive into the .htaccess file to redirect HTTP visitors to the HTTPS version of your site:
					RewriteEngine On
RewriteCond %{HTTPS} off
RewriteCond %{HTTP_HOST} ^(www\.)?domain\.com$ [NC]
RewriteRule ^(.*)$ https://www.domain.com/$1 [L,R=301]
Caution
Editing the .htaccess file can cause issues with more sites with complex structures. The rewrite below works best for websites on a dedicated server or VPS running Apache. You need to replace domain with your domain name for the sample code to work.
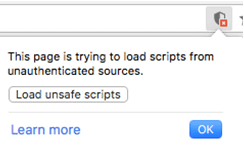
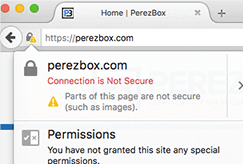
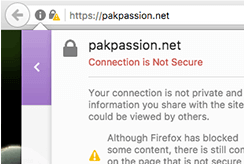
While your site is now available on HTTPS, you might still have resources linked to your website that load over HTTP. This includes things like images, videos, and external resources.
Browsers will block this content as “unsafe”, which can also cause broken functionality of your site and security warnings in browsers.
Examples of “Unsafe” Warnings:
You can use the same SSH access that you used to generate the certificate to run a command and find any files that reference http:// directly.
To find resources loading over HTTP, run the following command:
grep -r "http://"This will list all files to investigate in your server or CMS. Simply change all resource URLs from http:// to https:// or to a relative path.
You should also query your database or manually look through posts and pages for HTTP content. There are plugins and extensions available that can automate the process of rewriting URLS using HTTP to HTTPS (i.e. Really Simple SSL for WordPress).
If the HTTP resource is stored on your own website, we recommend using the relative directory and filename as follows.
Absolute Path:
<img src="https://example.com/images/pic.jpg">Relative Path:
<img src="/images/pic.jpg">Resources that can cause Mixed Content Warnings:
Caution
The last thing to prepare for is the potential negative impacts of using HTTPS. Following the steps below should help to minimize them.
Once configured, add and verify the new HTTPS site in Google Search Console. This will allow you to recrawl your site and submit a new XML sitemap with your HTTPS URLs.
For many SEO elements like “rel=canonical” and “open graph” tags, it is advisable to use an absolute URL, as these are read externally by social media sites and search engine crawlers.
It’s important to note that there will be a period of normalization after applying SSL, but in the end, it is a confirmed ranking signal according to Google.
Similarly, social sharing counters for older content will likely become invalid. This is because now there is a new URL starting with HTTPS rather than HTTP, and many tools count each as a separate URL with its own engagement metrics.
SEO & meta elements to check:
HTTPS is a great thing for the internet as a whole, it helps keep communication secret between users and the websites they visit. SSL secures data in transit but does not secure the website itself.
Website security is much more comprehensive than HTTPS/SSL alone. Think of HTTPS/SSL as one of many security controls to consider when thinking about your website’s security. Deploying HTTPS/SSL on your website does little to ensure your visitors are safe if you do not take to establish a secure hosting environment, such as using secure passwords and updating all website software.
We encourage website owners to think about website security holistically and consider leveraging a website security platform that offers a complete suite of security controls: protection, detection, monitoring, and incident response. If you have more questions on how platforms work or questions about this article please direct them to our team at info@sucuri.net.
Learn how the Sucuri Web Application Firewall (WAF) works in tandem with an SSL certificate. We’ll explain why it’s so important to encrypt data and why a custom SSL is the best choice when you’re getting your website behind our WAF.
You can typically get an SSL certificate from your hosting provider. There are many types of SSL certificates, so it’s important to evaluate your needs, and then make sure you get an SSL certificate that fits your needs.
Many providers offer one-click installation for SSL certificates, which makes the process easy enough for nearly anyone to handle. However, if this method isn’t available, you’ll need to upload a tool to your server in order to generate your SSL certificate.
If your provider offers one-click installation for your SSL certificate, it’s a very straightforward process that nearly anyone can handle. However, if one-click installation isn’t available, you’ll need to upload a tool to your server in order to generate your SSL certificate.
With the growing awareness around website security, many providers include a free SSL certificate with their products. For example, the Website Security Platform from Sucuri includes a free SSL certificate in addition to a robust set of security features.
Say on top emerging website security threats with our helpful guides, email, courses, and blog content.